Procrastination at Its Best

What should I be doing right now? School work. What am I actually doing? Sitting on my computer, jammin’ to some some country music. I don’t know what brought it on, but I got into a really big country mood today. I blame Youtube. Or Pandora. Just today, I downloaded Some Hearts and Carnival Ride by Carrie and Same Trailer Different Park by Kacey Musgraves, who actually inspired today’s post.

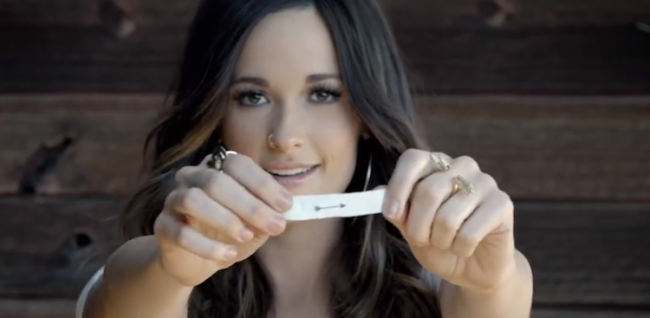
I heard Kacey on the radio a while back, but recently saw the music video for “Follow Your Arrow.” After watching the video, I was inspired by these screenshots to make a nail look.

Image

Image

With that, I present to you the nail look of the day!

DSC06127

I saw Ms. Musgraves  take out the arrow fortune, and thought it was the cutest thing! After the MV, I tried my best to come with an arrow that would be simple enough for me, but still looked cute. I’d say I was marginally successful. For my thumb and index and pinky fingers, I used Wet N Wild’s I Need a Refresh-Mint.

DSC06129

For my middle finger, I applied one coat of Julep’s Eden. On my pinky is 2/3 (I can’t remember) coats of Essie’s Beyond Cozy. And then for the arrow, I used Reverso from Circus by Andrea’s Choice, which I’m not really a big fan off.

DSC06130

DSC06136

DSC06131

Unfortunately, there was a little bit of smudging. I’m not sure if I didn’t wait long enough before applying my top coat (but really though, I waited over 30 minutes), if I didn’t have enough product on my brush, or if my top coat (Out the Door) just smudges easily.

What music are you currently really into? What top coat do you like best? Let me know in the comments!

♡ Melissa

Manicure Monday: Konad m95 Plate x3

I hope that the title of this post isn’t deceiving… I didn’t use the plate three times in a single manicure or anything like that. I was just trying to be cute and clever and thought that since this is my third time using the plate, I could pull off a vague, poor musical reference (Yeah x3 by Breezy). Plus I didn’t really know what to call this manicure, and this is all that came to mind.

IMG_20131007_222431

DSC05897

The Prodcuts

  • Base Coat/ Top Coat- L.A. Colors Calcium Treatment/ Wet N Wild Fast Dry
  • Wine Red/Purplish Polish- OPI No Spain No Gain
  • Silver Polish- Sally Hansen Silver Sweep
  • Glitter Polish- Essie Beyond Cozy
  • White Stamping Polish*- Claire’s Stamping Kit
  • Konad m95 plate, stamper, gift card (scraper), and a napkin or piece of paper

*Instead of using a stamping polish, I usually go with a standard white polish, but that won’t EVER happen again! I’m not sure if you can tell, but in comparison to my other manicures, the white this time around is much more vibrant and opaque! People aren’t lying when they say to invest in a quality white/black stamping polish.

As you can see in my manicure, I didn’t let the stamping polish dry enough or the thin fast dry top coat smeared the design. I found that when I used the base coat, which is thicker, first, there was less smearing. Evidently, I have some serious issues with this, so if you have any recommendations on the best top coats to use or any techniques, let me knowwwww!!

Again, sorry for getting this post out a week late (on the bright side, it was posted on time on insta ;))! School’s just been crazy and so freaking demanding D:< I hope everyone enjoys the next few days of the week and has a great weekend!

♡ Melissa

Manicure Monday: DIY Sugar Nails

Hey guys! First off, I just wanted to say that I hope that everyone is having a safe and fun summer!

Anyways, I know that it’s been forever since I’ve done a MM, but lately I’ve been uninspired and lazy. Luckily, I saw this video by RealAsianBeauty on Youtube. Prior to this video, she posted one with salt, which basically gives the same effect, but I like the sugar one more. If you follow me on instagram, you saw these nails earlier today, but unfortunately, I had some malware problems,that have been resolved, that were preventing me from updating my blog.

IMG_20130701_172713

The Products:

DSC05606

DSC05604

  • Polishes: Julep Abbie, Covergirl Lav-Endure, Covergirl Peaches and Cream, Wet n Wild Mint, Essie Cute As A Button, NYC Top Coat (also my base coat), and NYC Matte Me Crazy Top Coat

*My matte top coat, Matte Me Crazy was purchased at my local Wal-Mart for $1.99

  • Sugar
  • A small container/bowl

The Procedure:

  1. Paint all your nails with a base coat.
  2. Paint each finger with 1-2 coats of each colored polish. I personally did two coats each, but it’s not necessary. It might be better if you only applied one coat because it’ll prevent the polish from getting thick like mine did.
  3. Next, paint your first finger with a generous amount of top coat. You want a pretty decent coat because this is going to be your “glue”.
  4. After applying the top coat, immediately press your nail flat into the sugar. In the video, Kristina says that you can either pour the sugar on or dip your finger in it. I tried both and found that pressing it into the sugar is easier because you get even coverage. Also, try not to go too crazy. I tried to make sure that I covered all of my nail, even the sides, which added extra sugar, and contributed to them being kinda thick.
  5. Repeat steps 3 & 4 on all your fingers.
  6. Once you have sugar coated all your fingers, apply a coat of matte top coat. I didn’t think one coat sealed in the sugar enough, so I added another.

The Outcome:

https://www.instagram.com/p/bPXgoKIw7_

These nails are surprisingly easy to do. There isn’t too much fuss or mess. Obviously, you can’t expect them to last that long, sugar is landing on my keyboard as I type. I give them two days max. Unfortunately, the sugar will probably come off on your sheets when you sleep and I find that my fingers sometimes get sticky if my hands are wet because despite the top coat, the sugar will still dissolve. All in all, I think these nails are really cute and definitely worth a try if you want to try something different.

So, that’s it for this week’s Manicure Monday! I hope you guys enjoyed and I hopefully I’ll have another one up next week!

Do you have any easy DIY nail art tricks? Share them below!

~Melissa

Manicure Monday

So, as you guys know, I’m really bad at Manicure Monday’s. Monday’s are usually pretty busy for me, and I don’t have enough time to make a post or even do my nails. From now on, I’ll try my hardest to post every week, but the likelihood of that is very small.

Fortunately, I do have a nail look for this week! The items I used were:

DSC04645

A makeup sponge, a dotting tool (the thicker end), and a Bath and Body works candle lid.

DSC04644

My dotting tools came in a set like this from Amazon.

DSC04643

Essie Where’s My Chauffer and Circus by Andrea’s Choice Reverso

If you don’t have dotting tools, you can always use the top of a pin or a pencil eraser. Also, instead of using a candle lid, you can obviously just use paper or a plate or whatever. I just like using the lid because you can clean off the polish and use it again.

Here’s the final product:

DSC04642

My right hand.

I saw the tutorial for this nail art here. I really do love this look. It’s cute and very simple. In the video, the lady tells you to dab off the excess paint, but that’s just optional; I didn’t do that. Also, I don’t remember if she mentioned it, but I would wait a little for the base to dry before you start sponging on the other color. In total, this look probably took 10 minutes; I did it while watching tv, so you don’t need to concentrate too much. Honestly, the longest part was just painting the base coat. I hate working with white polish! Especially with this white. This the first time I used a polish by Andrea’s Choice, and I felt that because the brush is pretty thin, covering the whole nail took some time. It might just be because the polish was white though; they are generally harder to work with/more streaky.

I hope you enjoyed this nail look and that you have a great Monday!

~ Melissa

Christmas Nail Polish Haul and Mini Review (?)

Hey guys! HAPPY NEW YEARS!! Now that I’ve officially finished Gossip Girl, I decided that I wanted to do a nail polish haul and mini review(?). (The reason for the question mark is I’m not really sure much of a review I’ll end up giving, it may not even be helpful :P) Once again, sorry for the low quality photos, but hopefully they get the job done. Also, sorry for the streaky photos. Some of the polishes were kinda streaky, but for others, I was too impatient for the color to dry enough before adding another coat, which made them come out kinda yucky. I’ve never made a post like this and I don’t even know how to approach it, so it might be a bit sloppy. I’ll probably have formatting issue… Always, here’s the pictures!

Orly MagneticFX Nail Laquer: Paint on Electron; Ulta: Mint Condition, Bam-Blue-Zled; Wet n WIld Fergie Collection: Going Platinum, Gold Album

Orly MagneticFX Nail Laquer: Paint on Electron; Ulta: Mint Condition, Bam-Blue-Zled; Wet n WIld Fergie Collection: Going Platinum, Gold Album

Ulta Frost Bitten, Twice Shy Mini Set: To-boggan Shop, Eskimo Kisses, Snow Much to Do-So Little TIme,  In Hi-brr-nation, Hot Tottie Hottie

Ulta Frost Bitten, Twice Shy Mini Set: To-boggan Shop, Eskimo Kisses, Snow Much to Do-So Little TIme, In Hi-brr-nation, Hot Tottie Hottie

Essie Winter Collection 2012 Mini Set: Beyond Cozy, Where's My Chauffeur?, Leading Lady, Snap Happy, and Deborah Lippman: Let's Go Crazy

Essie Winter Collection 2012 Mini Set: Beyond Cozy, Where’s My Chauffeur?, Leading Lady, Snap Happy, and Deborah Lippman: Let’s Go Crazy

I guess, I’ll start by giving a small review of each product, or set of products?

DSC04370

1) I really liked this Orly polish, as you can tell it actually works, and there is some effect. The only thing that I    would have to complain about would be the magnet. It’s super tiny, and there is this little latch thing on it. I’m  not sure if it’s there to rest the tip of your nail on it to get as close as possible without touching the nail or what,  but I felt that it just got in the way. Also, like I said, the magnet is small and will only concentrate on the top 2/3  of the nail instead of the whole thing. So if you end up using this polish, I would just find a magnet that is  roughly the size of your thumb so that you’ll be able to get a full effect design.

2/3) These are both Ulta polishes, which I happened to get for free, and I love the colors. 2 is pretty mint green and 3 is a beautiful periwinkle-ish color. The only thing is that I found that they were sorta streaky. I’m not sure if I didn’t have enough product or what, but I found that using as few brush strokes as possible worked best. I ended up using two coats of 2, and 3 on 3.

4/5) I got these from a friend, and I was surprised; I didn’t know that Fergie had a nail polish collection. Anyways, right away, I was excited about the gold because I’ve been searching for a nice gold glitter. I wasn’t as excited for the silver one because they have so many silver/glittery colors and I thought it would just look the same as some of the others I’ve seen. After, applying two coats of each, I was very pleased. The glitter is very fine, which I liked.

DSC04375

6-10) Sorry the numbers are backwards, I didn’t think about the order as I was painting my nails. Anyways, these are Ulta polishes and some once again streaky, mainly the lighter colors like 7 and 8. 8 was the worst, with three coats you can still see parts of my nail.While I applied three coats of 8, I only two for the rest of the colors. I think my favorite color out of this set would have to be either 9 or 10. 9 is a dark heather-ish gray, and is a nice dark purple. 6 reminds me of Barney purple, 7 a very light, milky mauve-y color, and 8 an off white-ish milky blue.

DSC04380

11-14) These were all Essie colors, and when I saw these, I was super excited. I especially looked forward to trying on 12 and 13. 12 is a beautiful robin egg’s blue, but not quite the Tiffany’s kind, and 13 is gorgeous ruby color with matching glitter. I think 14 just looks like a light red, nothing too special.

DSC04381

When I was looking at 11 though, I was worried that it looked too much like 4, but once I applied the two, I saw that that wasn’t the case. While 4, has small, smooth glitters, 11 had bigger, slightly chunkier ones. Polish 4 is almost smooth to the touch and feels kinda like tinfoil and 11 feel roughers, kinda like styrofoam, if that makes sense…

15) I included 15 in this post, but I’ve decided to dedicate an individual post to since it’s a Deborah Lippman color, so look forward to that!

I hope you enjoyed this post and for those going back to school tomorrow like me, I hope you have a great last day of break!

~ Melissa