Procrastination at Its Best

What should I be doing right now? School work. What am I actually doing? Sitting on my computer, jammin’ to some some country music. I don’t know what brought it on, but I got into a really big country mood today. I blame Youtube. Or Pandora. Just today, I downloaded Some Hearts and Carnival Ride by Carrie and Same Trailer Different Park by Kacey Musgraves, who actually inspired today’s post.

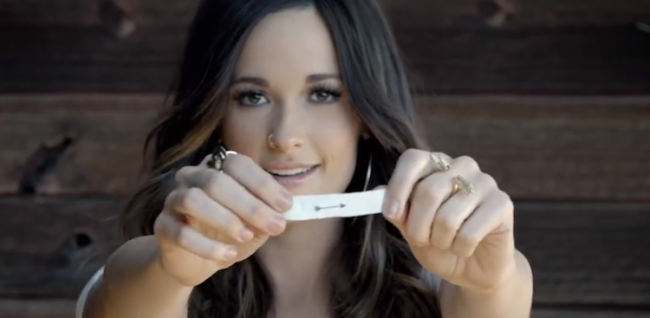
I heard Kacey on the radio a while back, but recently saw the music video for “Follow Your Arrow.” After watching the video, I was inspired by these screenshots to make a nail look.

Image

Image

With that, I present to you the nail look of the day!

DSC06127

I saw Ms. Musgraves  take out the arrow fortune, and thought it was the cutest thing! After the MV, I tried my best to come with an arrow that would be simple enough for me, but still looked cute. I’d say I was marginally successful. For my thumb and index and pinky fingers, I used Wet N Wild’s I Need a Refresh-Mint.

DSC06129

For my middle finger, I applied one coat of Julep’s Eden. On my pinky is 2/3 (I can’t remember) coats of Essie’s Beyond Cozy. And then for the arrow, I used Reverso from Circus by Andrea’s Choice, which I’m not really a big fan off.

DSC06130

DSC06136

DSC06131

Unfortunately, there was a little bit of smudging. I’m not sure if I didn’t wait long enough before applying my top coat (but really though, I waited over 30 minutes), if I didn’t have enough product on my brush, or if my top coat (Out the Door) just smudges easily.

What music are you currently really into? What top coat do you like best? Let me know in the comments!

♡ Melissa

Manicure Monday: Ombre Nails Take 2

I meant to have this up yesterday, but was busy with volunteering at school followed by a birthday party at Del Frisco’s.

I’ve done ombre nails before, but decided to give it another shot, with a new technique. This time around, I think my nails came out much better! Overall, I’m very happy with the results.

IMG_20130811_171847

The Products:

L.A. Colors Calcium Treatment/ NYC French Tip White/ Julep Eden/ Wet n Wild I Need a Refresh-Mint/ Orchid Twist of Lime/ Makeup Sponge

L.A. Colors Calcium Treatment/ NYC French Tip White/ Julep Eden/ Wet n Wild I Need a Refresh-Mint/ Orchid Twist of Lime/ Makeup Sponge

DSC04865

Polish Remover/ Synthetic Brush/ Q-tip (optional)

The Procedure:

  • Paint all your nails with a base coat to protect your nails. Then, paint on a white base; this will make the colors pop and more opaque.

DSC05728

  • Wait for the base color to completely dry. Then, unscrew the lid on the three colors for easy access. Take your makeup sponge and apply the first color and the last color on the sponge on half of the length of the sponge. Then, paint the second color in between the other two colors. This will create a better gradient because the the colors will blend together.
DSC05729

I use the left side of the sponge for my left hand and the right side for my right hand.

  • Line up the sponge with your finger. Then using a rolling motion, keep your finger still and move the sponge. Depending on how much polish you use, you may have to do this 1-2 times.

Ombre

  • Once you finish a nail, apply top coat. This will smooth out the design and make the colors blend flawlessly!
  • Repeat steps 2-4 on each nail.
  • Once all your nails are done, clean up your skin with polish remover and a brush/Q-tip.

That’s it for this Manicure Monday! I actually planned on stamping on a design from my Konad m95 plate, but as I was testing it for a review, it came out horrible, so I decided to go without it.

I hope that this tutorial was somewhat helpful and if you have any questions, you can comment below or email me! If you try out this manicure, please tag me at @lilkwazylau on instagram!

I hope that everyone enjoys the rest of the week!

~Melissa

Manicure Monday: DIY Sugar Nails

Hey guys! First off, I just wanted to say that I hope that everyone is having a safe and fun summer!

Anyways, I know that it’s been forever since I’ve done a MM, but lately I’ve been uninspired and lazy. Luckily, I saw this video by RealAsianBeauty on Youtube. Prior to this video, she posted one with salt, which basically gives the same effect, but I like the sugar one more. If you follow me on instagram, you saw these nails earlier today, but unfortunately, I had some malware problems,that have been resolved, that were preventing me from updating my blog.

IMG_20130701_172713

The Products:

DSC05606

DSC05604

  • Polishes: Julep Abbie, Covergirl Lav-Endure, Covergirl Peaches and Cream, Wet n Wild Mint, Essie Cute As A Button, NYC Top Coat (also my base coat), and NYC Matte Me Crazy Top Coat

*My matte top coat, Matte Me Crazy was purchased at my local Wal-Mart for $1.99

  • Sugar
  • A small container/bowl

The Procedure:

  1. Paint all your nails with a base coat.
  2. Paint each finger with 1-2 coats of each colored polish. I personally did two coats each, but it’s not necessary. It might be better if you only applied one coat because it’ll prevent the polish from getting thick like mine did.
  3. Next, paint your first finger with a generous amount of top coat. You want a pretty decent coat because this is going to be your “glue”.
  4. After applying the top coat, immediately press your nail flat into the sugar. In the video, Kristina says that you can either pour the sugar on or dip your finger in it. I tried both and found that pressing it into the sugar is easier because you get even coverage. Also, try not to go too crazy. I tried to make sure that I covered all of my nail, even the sides, which added extra sugar, and contributed to them being kinda thick.
  5. Repeat steps 3 & 4 on all your fingers.
  6. Once you have sugar coated all your fingers, apply a coat of matte top coat. I didn’t think one coat sealed in the sugar enough, so I added another.

The Outcome:

https://www.instagram.com/p/bPXgoKIw7_

These nails are surprisingly easy to do. There isn’t too much fuss or mess. Obviously, you can’t expect them to last that long, sugar is landing on my keyboard as I type. I give them two days max. Unfortunately, the sugar will probably come off on your sheets when you sleep and I find that my fingers sometimes get sticky if my hands are wet because despite the top coat, the sugar will still dissolve. All in all, I think these nails are really cute and definitely worth a try if you want to try something different.

So, that’s it for this week’s Manicure Monday! I hope you guys enjoyed and I hopefully I’ll have another one up next week!

Do you have any easy DIY nail art tricks? Share them below!

~Melissa